Update (11/5/2019)
As of writing this, the default KGL libraries for KOS are basically deprecated.
It's recommended to use Kazade's GLdc libraries over on GitHub.
To install Kazade's GLdc libraries:
1. Go to your kos/addons folder
2. type:
git clone https://github.com/Kazade/GLdc.git
3. type:
cd GLdc
4. type:
make defaultall
5. type:
make create_kos_link
Then, in your makefile, include "-lGLdc" instead of "-lGL".
Here's my makefile for reference:
Note: Most of the functions from KGL carry over to GLdc, with one exception: glutSwapBuffers() is now glKosSwapBuffers().
I've already covered how one would draw a triangle in the PVR, now I'm going to show you how to draw a triangle using OpenGL (via GLdc).
Why OpenGL?

OpenGL is a relatively platform-independent graphics library that is almost universally used across a multitude of devices. It's relatively easy to use, and often forms the graphical basis for many cross-platform applications or libraries. The library provides a higher level way of communicating with the respective system's GPU.
Relevant Example Projects
- Anything in kos/addons/GLdc/samples
Specifically, the examples by Nehe are wonderful! - kos/examples/dreamcast/kgl
The Code
And that's it! Almost half the size of our PVR-rendered triangle, and this is including extraneous input!
Keep in mind, a lot of the work involved with OpenGL is abstracted away behind the libraries. No need to setup everything manually (like most OpenGL tutorials will teach you how to do). You're not going to be an expert in OpenGL after learning how to draw this triangle, but regardless, getting anything to draw on the screen is a victory, in my book!
I commented the code, so I won't be breaking it down line-by-line, but I do want to highlight some key similarities and differences between working with the PVR, and OpenGL.
The Draw Loop
The draw loop is pretty similar to the PVR.
First, we clear any of the buffer bits we need to clear. In this case, the only buffer bit we need to worry about is color. Then, we tell OpenGL we're about to draw something with glBegin(), telling it what kind of object we're planning on drawing. You can find these by looking at the OpenGL documentation.
After that, we're free to draw our vertices! Once we're done with that, we close it out with glEnd() and swap our video buffers with glKosSwapBuffers().
Submitting Vertices to Draw
One key difference, which frees up a significant chunk of code, is how OpenGL handles submitting vertices to be drawn. What was 4 lines of code for the PVR is chopped in half!
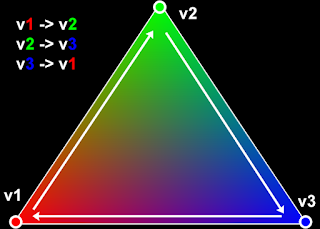
 First, we tell OpenGL what the color (the Red, Green, and Blue values) of our next vertex is going to be. Then, we tell it the X, Y, and Z coordinates of the vertex we want to draw.
You might remember that from the PVR tutorial, vertices (allegedly) needed to be submitted clockwise. OpenGL doesn't really require that. However, it does require you to sort of loop back if you want to continue a new triangle. Think of it as if you had one continuous line that you're connecting between points.
We'll get more into this in the follow-up tutorial, where we actually draw a pyramid, but for now you don't need to worry about looping back.
Coordinates
OpenGL is a little funkier than the PVR, in that the screen actually goes from -1, to 1 (left and right sides of the screen respectively).
So, if our screen is 640x480 pixels, X=-1 in OpenGL would be the same as X=0 on the screen, and X=1 in OpenGL is would be the same as X=680 on the screen. X=0 in OpenGL would be smack-dab in the middle of c, at X=320.
It's a little confusing, but it makes sense if you think about it in a 3D space! Go to the left, and your X position will be less than 0. Go to the right, and your X position will be greater than 0.
If you're confused by this, try going into Unity or Unreal Engine and watch the coordinates of an object's position while you're moving it around!
And that's pretty much it! We have a triangle, just like the one we drew with the PVR! You'll notice we still don't have perspective, though! It's just a flat triangle on the screen. How do we fix that? In the next tutorial, I'll explain how to draw an object and display it in 3D!
If I did a poor job of explaining anything, please let me know! I'm a bit more familiar with this stuff, now, so I'm forgetting things that might be important to explain.


No comments:
Post a Comment